
Monday, August 7, 2017

Thursday, July 13, 2017
Lands End to Golden Gate Bridge, San Francisco, CA
I took my special companion here on a Saturday afternoon. After a late lunch, we started our journey on the 1.5-mile Lands End Coastal trail, and decided to continue on to the Golden Gate Bridge, retracing our steps back to the starting point for a 7 1/2 mile round-trip hike.


Trails: Coastal Trail, El Camino Del Mar/Lincoln Blvd.
Difficulty: Moderate to Strenuous


Trails: Coastal Trail, El Camino Del Mar/Lincoln Blvd.
Difficulty: Moderate to Strenuous
Mussel Rock Beach Park, Daly City, CA
Recommended by my brother, this SF-area park is full of nice photo ops. Prepare to get wet if you venture near the rocks.


Wednesday, May 31, 2017
Mount Si, North Bend, WA
This strenuous hike is about an hour east of Seattle. It provides stunning views of Mt. Rainier.


Trail: Mt. Si Trail
Difficulty: Strenuous (7.6 miles out & back, 3277ft elevation change)


Trail: Mt. Si Trail
Difficulty: Strenuous (7.6 miles out & back, 3277ft elevation change)
Saturday, May 27, 2017
Phantom Lake, Bellevue, WA
This lake near Seattle makes for a nice spring walk.

Trail: Lake to Lake Trail
Difficulty: Easy to Moderate

Trail: Lake to Lake Trail
Difficulty: Easy to Moderate
Friday, May 26, 2017


Sunday, April 23, 2017
Lake Chabot Regional Park, Castro Valley, CA
This East bay hike was recently recommended to me, and I was pleasantly surprised. It features pretty views of Lake Chabot and the bay. Good for walking the dog if you have one.


Trail: Unnamed
Difficulty: Moderate (some slope, sun exposure, windy in certain areas)


Trail: Unnamed
Difficulty: Moderate (some slope, sun exposure, windy in certain areas)
Ravenswood Open Space Preserve, East Palo Alto, CA
Next to the Dumbarton bridge, this marshland has some opportunities for birdwatching, but is very isolated. Do not hike here alone.

Trail: Bay Trail
Difficulty: Moderate (isolated, windy)

Trail: Bay Trail
Difficulty: Moderate (isolated, windy)
Saturday, April 15, 2017
Los Trancos Open Space Preserve, Los Altos, CA
Hidden in the hills southwest of Los Altos, this hike features a creek in the middle of the woods.

The trail itself is flat and not very long, but it is somewhat isolated. Though signage is good one can still lose one's way. It is advisable to bring friends and a gps-capable device.
Trail: Lost Creek Trail
Difficulty: Moderate (isolation)

The trail itself is flat and not very long, but it is somewhat isolated. Though signage is good one can still lose one's way. It is advisable to bring friends and a gps-capable device.
Trail: Lost Creek Trail
Difficulty: Moderate (isolation)
Sunday, April 9, 2017
Joseph D. Grant County Park, Mount Hamilton, CA
I took a spur-of-the-moment hike here today.
The park features a lake and several trails leading up into the foothills adjacent to Mt. Hamilton. After walking around Grant lake, one can take the Halls Valley Trail up the foothills.
Grant Lake

Halls Valley trail: Note the cows grazing on the grassy hillside.

About halfway up the Halls Valley trail, 3 cows blocked the trail up ahead and stood their ground. Instead of waiting it out, I decided to turn back as it was getting late.
Trail: Halls Valley Trail
Difficulty: >Moderate (length, slope, secluded)
The park features a lake and several trails leading up into the foothills adjacent to Mt. Hamilton. After walking around Grant lake, one can take the Halls Valley Trail up the foothills.
Grant Lake

Halls Valley trail: Note the cows grazing on the grassy hillside.

About halfway up the Halls Valley trail, 3 cows blocked the trail up ahead and stood their ground. Instead of waiting it out, I decided to turn back as it was getting late.
Trail: Halls Valley Trail
Difficulty: >Moderate (length, slope, secluded)
Sunday, April 2, 2017
Greyhound Rock County Park, Davenport, CA
At the suggestion of one of my uncles, I decided to drive here and look around. The park itself is located about 15 miles north of Santa Cruz, along highway 1. After parking, take the paved road down to the beach, where you will be greeted by a beautiful view of the rock.

It can be helpful to time your visit with low tide.
Having already hiked earlier that day (see previous post), I decided not to climb onto Greyhound rock itself, and plan to return sometime in the not-too-distant future to do so.

It can be helpful to time your visit with low tide.
Having already hiked earlier that day (see previous post), I decided not to climb onto Greyhound rock itself, and plan to return sometime in the not-too-distant future to do so.
Pomponio State Beach, San Gregorio, CA
This beach is located 12 miles south of Half Moon Bay along Highway 1--a great place to spend an afternoon to escape one's daily concerns and unwind. It is not too crowded here, and you can get a nice, secluded view of the coastal bluffs and ocean if you walk far enough along the beach.


Saturday, April 1, 2017
Alum Rock, San Jose, CA
This park has something for everyone. It features wooded areas, shady walks next to Penitencia Creek, and a slightly uphill walk to Eagle Rock.

Trails: Penitencia Creek, Inspiration Point, & Eagle Rock trails
Difficulty: Moderate (sun exposure in certain areas)

Trails: Penitencia Creek, Inspiration Point, & Eagle Rock trails
Difficulty: Moderate (sun exposure in certain areas)
Tuesday, March 28, 2017
Mission Peak (via Ohlone College)
I recently redid Mission Peak, this time from the Ohlone College side.

Trail: Peak Trail
Difficulty: >Moderate

Trail: Peak Trail
Difficulty: >Moderate
Sunday, March 12, 2017
Mount Diablo--Donner Creek Loop Trail, Clayton, CA
In early March I hiked Mt. Diablo, at the suggestion of a charming hiking companion.
We took on the Donner Creek Loop trail, which consists of a 5.2-mile loop with a 1300-foot elevation gain. Due to the late winter rains, the first mile of trail was dotted with muddy areas, but also provided beautiful views of lush green hillsides not seen in other seasons.

The trail then gets steeper, before leveling off briefly near the halfway point, where several different waterfalls become visible. Here a couple short scrambles are required--one uphill and the other downhill.
The second half of the hike was mostly level or downhill, and we made our way back to the starting point in good time to avoid the mid-afternoon rain.
Trail: Donner Creek Loop Trail
Difficulty: >Moderate (steepness, some scrambling required, some signs easy to miss)
We took on the Donner Creek Loop trail, which consists of a 5.2-mile loop with a 1300-foot elevation gain. Due to the late winter rains, the first mile of trail was dotted with muddy areas, but also provided beautiful views of lush green hillsides not seen in other seasons.

The trail then gets steeper, before leveling off briefly near the halfway point, where several different waterfalls become visible. Here a couple short scrambles are required--one uphill and the other downhill.
The second half of the hike was mostly level or downhill, and we made our way back to the starting point in good time to avoid the mid-afternoon rain.
Trail: Donner Creek Loop Trail
Difficulty: >Moderate (steepness, some scrambling required, some signs easy to miss)
Saturday, February 11, 2017
Pulgas Ridge, Redwood City, CA
This is a pleasant hike off I-280 (Edgewood Rd exit) in Redwood City. Found & completed through a hiking meetup.


Sunday, January 15, 2017
Baylands trail/Shoreline park redux
I did another short hike/jog here, this time in the early evening.


Sunday, December 25, 2016
Anti-Aircraft Peak, WA
The former site of a missile radar station makes for a nice Seattle-area hike.


Sunday, December 18, 2016
Mori Point, Pacifica, CA
Located in Pacifica, the views of the Pacific ocean are beautiful on a sunny day, if you are lucky enough to avoid the fog.

Trail: Mori Point Trail
Difficulty: Moderate

Trail: Mori Point Trail
Difficulty: Moderate
Saturday, December 10, 2016
Seal Point Park, San Mateo, CA
Located in San Mateo, this park provides good views of the SF bay.

Difficulty: Easy

Difficulty: Easy
Monday, November 28, 2016
Red Rock Canyon, NV
Thirty minutes west of Las Vegas, Red Rock Canyon is a great way to spend an afternoon taking a break from the action on the strip. Entrance fee is $7 and they give you a visitor guide with map. Stop at the visitor center where you can ask questions and restrooms are available. Afterwards, drive along the 13-mile Scenic Drive loop, and pick from the 19 different trails as you traverse the loop. Each trail is between 0.75-6 miles; most are around 2-3. The below are photos from my trip with cousins & brother.
Calico

photo by: Mike Yu
Keystone Thrust

Pine Creek Canyon

Trail: Keystone Thrust, Pine Creek Canyon
Difficulty: Moderate (sun exposure, rocky terrain (Keystone), wind chill)
Calico

photo by: Mike Yu
Keystone Thrust

Pine Creek Canyon

Trail: Keystone Thrust, Pine Creek Canyon
Difficulty: Moderate (sun exposure, rocky terrain (Keystone), wind chill)
Saturday, October 15, 2016
Tips on preparing for a day hike
It's been raining a lot this weekend in California, so I thought this would be a good opportunity to go over knowledge I've built up to better prepare for a hike.
1. Drive carefully. Get good directions & know them before you begin. Make sure you are not sleepy. Get a full tank of gas. Make sure your car battery is working well.
2. Bring a cell phone with GPS capability, camera, and chargers for both. Make sure they are charged near 100% at the start of your hike!
3. Allow plenty of time to complete your hike and get to your car BEFORE sunset.
4. Bring water and energy bars (in a good backpack).
5. Safer to hike with others than by yourself. If you must go alone, tell someone where you are going beforehand.
6. Eat a good meal before the hike, to avoid a later "crash".
7. Check the weather beforehand. Don't hike in landslide-prone areas in wet conditions, areas near burning wildfires, active volcanic regions, you get the idea...also, some hikes are just better during certain times of year.
8. Heed warning signs. Don't venture into closed or potentially dangerous areas.
9. Bring warm clothing just in case the weather changes for the worse.
10. Bring money for parking fees. Check where to park before your drive.
11. Plan your meals beforehand.
12. Apply sunscreen. Bring a jacket/hat in windy areas.
13. Get a trail map, either beforehand or at the trail head/visitor center if available.
14. Be friendly (or yield if appropriate) to fellow hikers or bikers. Warn them of dangerous conditions if you encounter them.
15. Keep your distance from large or dangerous animals. Bring a hiking stick for self-defense.
16. Bring a flashlight, first aid kit, whistle, pen, and tissue paper.
17. Get good hiking shoes that grip the trail/road well.
18. Pause at trail junctions and check your trail map/GPS. If needed take a photo of the signs/general area if you will return later.
19. Check sunset times. If hiking on a beach, check tide tables.
20. Bring a hiking stick for added stability and to fend off animals.
21. As a general rule, have enough supplies for unexpected scenarios, i.e. getting lost & staying overnight on a trail.
22. Do not let your enthusiasm for the hike allow you to take unnecessary risks; use common sense.
a. It's okay to pull over to a parking lot, take a 20-minute nap and/or drink a caffeine drink if tired driving.
b. Avoid risking your safety for a great photograph.
c. Macho men/women: we know you'd like to get to the top or finish line; but do not continue towards your "goal" if it prevents you from getting back to your car before sunset, or increases the chance of a fall/accident.
d. Sporty women/men: it's nice to wear clothing that you feel & look good in; as long as you have warm clothing as backup when the weather breaks.
1. Drive carefully. Get good directions & know them before you begin. Make sure you are not sleepy. Get a full tank of gas. Make sure your car battery is working well.
2. Bring a cell phone with GPS capability, camera, and chargers for both. Make sure they are charged near 100% at the start of your hike!
3. Allow plenty of time to complete your hike and get to your car BEFORE sunset.
4. Bring water and energy bars (in a good backpack).
5. Safer to hike with others than by yourself. If you must go alone, tell someone where you are going beforehand.
6. Eat a good meal before the hike, to avoid a later "crash".
7. Check the weather beforehand. Don't hike in landslide-prone areas in wet conditions, areas near burning wildfires, active volcanic regions, you get the idea...also, some hikes are just better during certain times of year.
8. Heed warning signs. Don't venture into closed or potentially dangerous areas.
9. Bring warm clothing just in case the weather changes for the worse.
10. Bring money for parking fees. Check where to park before your drive.
11. Plan your meals beforehand.
12. Apply sunscreen. Bring a jacket/hat in windy areas.
13. Get a trail map, either beforehand or at the trail head/visitor center if available.
14. Be friendly (or yield if appropriate) to fellow hikers or bikers. Warn them of dangerous conditions if you encounter them.
15. Keep your distance from large or dangerous animals. Bring a hiking stick for self-defense.
16. Bring a flashlight, first aid kit, whistle, pen, and tissue paper.
17. Get good hiking shoes that grip the trail/road well.
18. Pause at trail junctions and check your trail map/GPS. If needed take a photo of the signs/general area if you will return later.
19. Check sunset times. If hiking on a beach, check tide tables.
20. Bring a hiking stick for added stability and to fend off animals.
21. As a general rule, have enough supplies for unexpected scenarios, i.e. getting lost & staying overnight on a trail.
22. Do not let your enthusiasm for the hike allow you to take unnecessary risks; use common sense.
a. It's okay to pull over to a parking lot, take a 20-minute nap and/or drink a caffeine drink if tired driving.
b. Avoid risking your safety for a great photograph.
c. Macho men/women: we know you'd like to get to the top or finish line; but do not continue towards your "goal" if it prevents you from getting back to your car before sunset, or increases the chance of a fall/accident.
d. Sporty women/men: it's nice to wear clothing that you feel & look good in; as long as you have warm clothing as backup when the weather breaks.
Sunday, September 18, 2016
Rattlesnake Ledge, Snoqualmie region, WA
When my father suggested to do this hike with him during a Seattle visit, I pictured a nice routine hike on a Sunday morning. Instead, my expectations were blown away. Parking is plentiful (and free!) but get there early to avoid crowds.
The trail starts out innocently enough at Rattlesnake Lake. It then immediately moves into a lush forest over several switchbacks. At about mile 2 is a junction. Bear right to get to Rattlesnake ledge, where you'll emerge into a clearing onto a large rocky ledge. Those who persist to this point will be stunned by storybook 360-degree views of tree-covered Mount Si and gorgeous Rattlesnake lake. The scenery will be difficult to beat on a sunny day.


Trail: Rattlesnake Ledge Trail (4-mile round trip, 1100-ft elevation gain)
Difficulty: Moderate
The trail starts out innocently enough at Rattlesnake Lake. It then immediately moves into a lush forest over several switchbacks. At about mile 2 is a junction. Bear right to get to Rattlesnake ledge, where you'll emerge into a clearing onto a large rocky ledge. Those who persist to this point will be stunned by storybook 360-degree views of tree-covered Mount Si and gorgeous Rattlesnake lake. The scenery will be difficult to beat on a sunny day.


Trail: Rattlesnake Ledge Trail (4-mile round trip, 1100-ft elevation gain)
Difficulty: Moderate
Grays Harbor National Wildlife Refuge, WA
Located near the logging city of Hoquiam, this marshland is the site of bird migrations in the spring and fall. The Sandpiper trail provides a good view of the marshlands and Grays harbor, along with the abundant plant and animal life.


Thanks to my parents for playing tour guide on this hike!
Trail: Sandpiper Trail
Difficulty: Easy to Moderate (wind)


Thanks to my parents for playing tour guide on this hike!
Trail: Sandpiper Trail
Difficulty: Easy to Moderate (wind)
Friday, September 16, 2016
Barr Trail near Manitou incline, Colorado Springs, CO
During a work trip to Colorado Springs, I did a short 5-mile round-trip hike along the first 2 1/2 miles of the Barr Trail, approaching the top of the Manitou incline (which itself was closed for maintenance, unfortunately).
Trail: Barr Trail (first 2 miles), Manitou incline connector trail
Difficulty: >Moderate


Trail: Barr Trail (first 2 miles), Manitou incline connector trail
Difficulty: >Moderate


Sunday, September 4, 2016
★ Point Reyes National Seashore, Marin County, CA
About 40 miles northwest of San Francisco, this coastal wonder is a photographer's dream come true. It was one of those hikes I had wanted to do for years but never got around to, until I suggested it to my uncle and brother in the days leading up to Labor day weekend 2016. And so the three of us began a little adventure that Saturday.
The first point of interest is the Point Reyes Lighthouse. From Sir Frances Drake Blvd turn right (west) at the Chimney Rock/Lighthouse junction. After finding parking, go west until reaching the visitor center. You can get a free trail map there if needed. Descend 309 steps until you reach the lighthouse. If desired one can go inside. Ascend 309 steps for a good workout, and retrace the remainder of your path until getting back to the car.
Next, take Sir Frances Drake Blvd and keep right at the junction. Park at the Chimney Rock trail head. Take Chimney Rock Trail 0.4 miles. Heed all warning signs and continue past the junction. If you decide to risk going on the 0.1 mile Headlands Overlook Trail exercise extreme caution & proceed at your own risk. [Note: Maintain a large distance from the overhanging cliff edge--it and surrounding areas can give way at any time and a fall at that height is likely fatal!!] Head east on Chimney Rock Trail another 0.3 miles to take in the 300+ degree panoramic view of the ocean and headlands. Turn back and go the 0.7 miles back to the parking area.


I'd like to thank my Uncle David for driving & playing tour guide once again!
Note: It gets very windy here.
Trail: Pt Reyes lighthouse (1.3 to 2 miles round trip), Chimney Rock trail (1.5 mile round trip)
Difficulty: >Moderate (due to safety considerations)
The first point of interest is the Point Reyes Lighthouse. From Sir Frances Drake Blvd turn right (west) at the Chimney Rock/Lighthouse junction. After finding parking, go west until reaching the visitor center. You can get a free trail map there if needed. Descend 309 steps until you reach the lighthouse. If desired one can go inside. Ascend 309 steps for a good workout, and retrace the remainder of your path until getting back to the car.
Next, take Sir Frances Drake Blvd and keep right at the junction. Park at the Chimney Rock trail head. Take Chimney Rock Trail 0.4 miles. Heed all warning signs and continue past the junction. If you decide to risk going on the 0.1 mile Headlands Overlook Trail exercise extreme caution & proceed at your own risk. [Note: Maintain a large distance from the overhanging cliff edge--it and surrounding areas can give way at any time and a fall at that height is likely fatal!!] Head east on Chimney Rock Trail another 0.3 miles to take in the 300+ degree panoramic view of the ocean and headlands. Turn back and go the 0.7 miles back to the parking area.


I'd like to thank my Uncle David for driving & playing tour guide once again!
Note: It gets very windy here.
Trail: Pt Reyes lighthouse (1.3 to 2 miles round trip), Chimney Rock trail (1.5 mile round trip)
Difficulty: >Moderate (due to safety considerations)
Sunday, August 21, 2016
★ Pinnacles National Park, San Benito, CA
What was supposed to be a relaxing 5-mile hike on a Sunday afternoon turned out to be a very harrowing experience.
Prerequisites: get a full tank of gas 25 miles before getting to the park as there are no services after that. Explore the caves with a flashlight. If you must do the 5-mile hike, go with someone who has done the hike before and do it during the winter or early spring. Get a working GPS and trail map. Bring >=1.5 liters water per person.
I started my journey at Bear Gulch and decided to explore Bear Gulch cave.

After exiting I got a good view of Bear Gulch reservoir.

I then took Rim trail to High Peaks trail and walked 1.5 miles. Near the end was a steep series of switchbacks in hot summer weather and this was when a worried feeling started setting in. At the junction with Juniper Canyon trail I continued east another 1.3 miles on High Peaks trail. It was in this stretch of the trail that I felt the most anxiety and ACTUAL FEAR. Walking around the rock formations, every twist and turn was an opportunity to lose one's sense of direction. Signage was sparse, there were almost no people to follow, and at places the trails were not defined well enough. Luckily GPS came to my rescue. The scenery was breathtaking though, given the vastness of the whole area.

But for me, this (the GPS display on my phone and the signage to turn onto Condor Gulch Trail back to the Visitor center) was the best piece of scenery.

By this time it was 4:30pm. I ran into several groups of hikers still going uphill and began encouraging some of them to turn around given the lateness in the day and my recent (mis)adventures.
Trail: High Peaks trail and Condor Gulch trail loop, detouring to Bear Gulch cave at beginning, 6.1 mi
Difficulty: Strenuous (potential to get lost, steepness, heat, extreme heights)
Prerequisites: get a full tank of gas 25 miles before getting to the park as there are no services after that. Explore the caves with a flashlight. If you must do the 5-mile hike, go with someone who has done the hike before and do it during the winter or early spring. Get a working GPS and trail map. Bring >=1.5 liters water per person.
I started my journey at Bear Gulch and decided to explore Bear Gulch cave.

After exiting I got a good view of Bear Gulch reservoir.

I then took Rim trail to High Peaks trail and walked 1.5 miles. Near the end was a steep series of switchbacks in hot summer weather and this was when a worried feeling started setting in. At the junction with Juniper Canyon trail I continued east another 1.3 miles on High Peaks trail. It was in this stretch of the trail that I felt the most anxiety and ACTUAL FEAR. Walking around the rock formations, every twist and turn was an opportunity to lose one's sense of direction. Signage was sparse, there were almost no people to follow, and at places the trails were not defined well enough. Luckily GPS came to my rescue. The scenery was breathtaking though, given the vastness of the whole area.

But for me, this (the GPS display on my phone and the signage to turn onto Condor Gulch Trail back to the Visitor center) was the best piece of scenery.

By this time it was 4:30pm. I ran into several groups of hikers still going uphill and began encouraging some of them to turn around given the lateness in the day and my recent (mis)adventures.
Trail: High Peaks trail and Condor Gulch trail loop, detouring to Bear Gulch cave at beginning, 6.1 mi
Difficulty: Strenuous (potential to get lost, steepness, heat, extreme heights)
Mt. Tamalpais - Matt Davis Steep Ravine Loop, Mill Valley, CA
Mt. Tamalpais gives hikers a good combination of redwoods and coastal views. The weather is also comfortably cool even during the summer.


Trail: Matt Davis-Steep Ravine Loop, 6.7 miles
Difficulty: >Moderate


Trail: Matt Davis-Steep Ravine Loop, 6.7 miles
Difficulty: >Moderate
Saturday, August 13, 2016
El Corte de Madera Creek Open Space Preserve, Redwood City, CA
This hike features redwoods and a tafoni sandstone formation. The trail is very steep, bring at least 4 bottles of water per person.
Start at the East end of the park for a 10-mile clockwise loop. Take the following trails in order: Sierra Morena .3, Gordon Mill .5, Crossover .2, Crosscut .5, Timberview .5, Giant Salamander 1.1, Methuselah .3, Fir 1.4 (to vista point and back to junction), Resolution 1.1, El Corte de Madera Creek .6, Tafoni 1.1 (to Sandstone Formation and back to junction), Fir .2, Manzanita .1, Methuselah .7, and Sierra Morena .8.

Trail: See above. About 10 miles
Difficulty: Moderate to Strenuous (steepness, length)
Start at the East end of the park for a 10-mile clockwise loop. Take the following trails in order: Sierra Morena .3, Gordon Mill .5, Crossover .2, Crosscut .5, Timberview .5, Giant Salamander 1.1, Methuselah .3, Fir 1.4 (to vista point and back to junction), Resolution 1.1, El Corte de Madera Creek .6, Tafoni 1.1 (to Sandstone Formation and back to junction), Fir .2, Manzanita .1, Methuselah .7, and Sierra Morena .8.

Trail: See above. About 10 miles
Difficulty: Moderate to Strenuous (steepness, length)
Sunday, August 7, 2016
Purisima Creek Redwoods Preserve, Redwood City, CA
This hike begins at the east entrance of the park, just off highway 35. Take the North Ridge Trail for at least 0.8 miles until you hit Whittemore Gulch Trail, then turn left. Continue westward on the latter for 2.2 miles and at the junction stay left on Harkins Ridge Trail coming back eastbound for 3 miles. Turn right on North Ridge Trail and walk the remaining 0.3 miles to the parking lot.

Trail: North Ridge, Whittemore Gulch, & Harkins Ridge trails, 6.6 mi
Difficulty: >Moderate (steepness)

Trail: North Ridge, Whittemore Gulch, & Harkins Ridge trails, 6.6 mi
Difficulty: >Moderate (steepness)
Saturday, July 30, 2016
Big Basin Redwoods State Park--Berry Creek Falls, Boulder Creek, CA
This 10+ mile hike starts at Park Headquarters on the eastern end of the park. Try to get there before peak hours to avoid parking issues (the fee is $10), and ask for a trail map.
From the park headquarters, head north on the Skyline-to-the-Sea trail .3 mile until you hit Dool trail, turn left, then left again immediately on Sunset trail (see trail map). Head west on Sunset trail for about 4+ miles until you hit Berry Creek Falls trail, then turn left. You'll see a brief clearing, and a couple smaller waterfalls. Enjoy the redwoods along the way.

After going about 1 mile on Berry Creek Falls trail you'll finally reach Berry Creek falls.

Continuing past the falls the trail becomes Skyline-to-the-Sea trail. Follow this trail 4 miles back to the parking area. All distances are approximate. Net elevation change is about 1000ft, but hikers actually climb double that amount due to the jagged elevation profile.
Trail: Skyline to the Sea-Sunset loop, 10.5 miles
Difficulty: moderate to strenuous (elevation change, length)
From the park headquarters, head north on the Skyline-to-the-Sea trail .3 mile until you hit Dool trail, turn left, then left again immediately on Sunset trail (see trail map). Head west on Sunset trail for about 4+ miles until you hit Berry Creek Falls trail, then turn left. You'll see a brief clearing, and a couple smaller waterfalls. Enjoy the redwoods along the way.

After going about 1 mile on Berry Creek Falls trail you'll finally reach Berry Creek falls.

Continuing past the falls the trail becomes Skyline-to-the-Sea trail. Follow this trail 4 miles back to the parking area. All distances are approximate. Net elevation change is about 1000ft, but hikers actually climb double that amount due to the jagged elevation profile.
Trail: Skyline to the Sea-Sunset loop, 10.5 miles
Difficulty: moderate to strenuous (elevation change, length)
Wednesday, July 6, 2016
Hermosa Beach, Los Angeles, CA
This L.A. beach is quite beautiful in the evening. Thanks to Stephanie for recommending it!

Difficulty: Easy

Difficulty: Easy
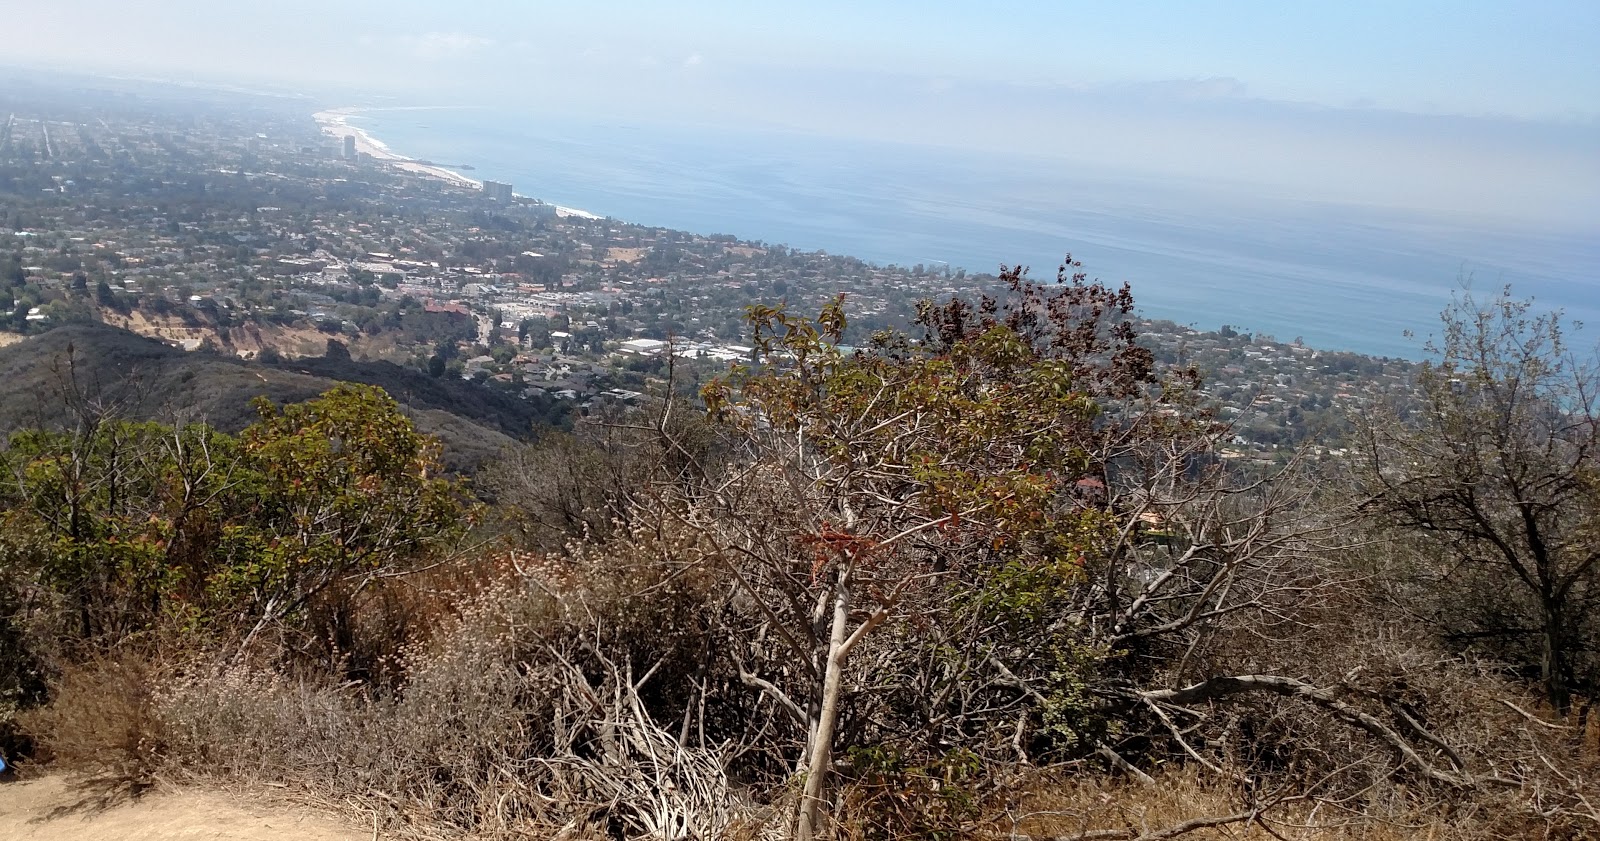
Temescal Ridge Trail, Los Angeles, CA
Situated in Northern L.A., this hike is known for its excellent views of Santa Monica. Start at Temescal Canyon Trail, then hike north until you hit Temescal Ridge Trail and make your return journey completing a 4-mile loop.

Trail: Temescal Canyon Loop, 3.5 miles, 800ft elev. gain
Difficulty: >Moderate (dusty, trail not well marked)
Trail: Temescal Canyon Loop, 3.5 miles, 800ft elev. gain
Difficulty: >Moderate (dusty, trail not well marked)
Subscribe to:
Posts (Atom)